Getting back to my current thoughts on deploying ESXi hosts, see my article Beyond user driven ESXi installs here, I wanted to go a little deeper into the Kickstart realm.
A Kickstart system is a method used to boot an ISO from some form of media, and then provide a certain configuration file (kickstart file) to ensure consistent installation. In my reading about Kickstart systems the main thing that keeps being repeated is, do all this in Linux. Take this version of Linux (usually Red Hat or CentOS) and build this Kickstart server. Let me say this right now, I relish the idea of running a Linux system to do this sort of task.
However, for me and most of my colleagues on my team at work, there would be a steeper learning curve with Linux. I decided to take a different turn at the “Choose your OS” step. I went with Windows Server 2012 R2. I may still end up using a Linux Kickstart system for the related project. I am about to show you how to do configure a Windows Server as a Kickstart system. Kickstart on Windows, it might sound more complicated than it actually is. My goal here is to translate the ESXi kickstart process to make it more accessible to the non-linux speaking folks.
Show me the outline:
- Copy of VMware instructions on Building a Kickstart server
- Pick an Operating Systems – Windows Server 2012 R2
- PXE Boot System? – TFTP32 (or 64-bit)
- DHCP Serer? TFTP32 (or 64-bit) handles that also
- Get Linux boot file - gPXElinux.0 – Get this from a special download site
- Select how to present Kickstart file (and possibly other files) – NFS
- Build Kickstart script file - Get basic examples and modify
- Select flavor of ESXi – I chose HPE ESXi 6.0 Update 2
NOTE: Most physical VMware hosts in my environment will be HPE Proliant G9 (1U-Pizza-box)
So what now?
Well… first things first, let’s go get our items on the grocery list from above.
-
!–GOLD MINE–! VMware’s documentation on building a kickstart system is really well done, but it requires a very careful and close read. Essentially, this document will walk you through a Linux kickstart if you are an everyday Linux user. Lucky for me, I have used it enough Linux from a previous life somewhere to be able to stumble and fumble my way through it.
-
Build Windows Server 2012 R2 VM - I will not be going into the details of this any further.
-
Get TFTP32 from here - I am using the 64-bit version.
-
Oh wait, (smack!) TFTP (mentioned in 3 above) will take care of both TFTP and DHCP (and give you the platform for PXE booting)
-
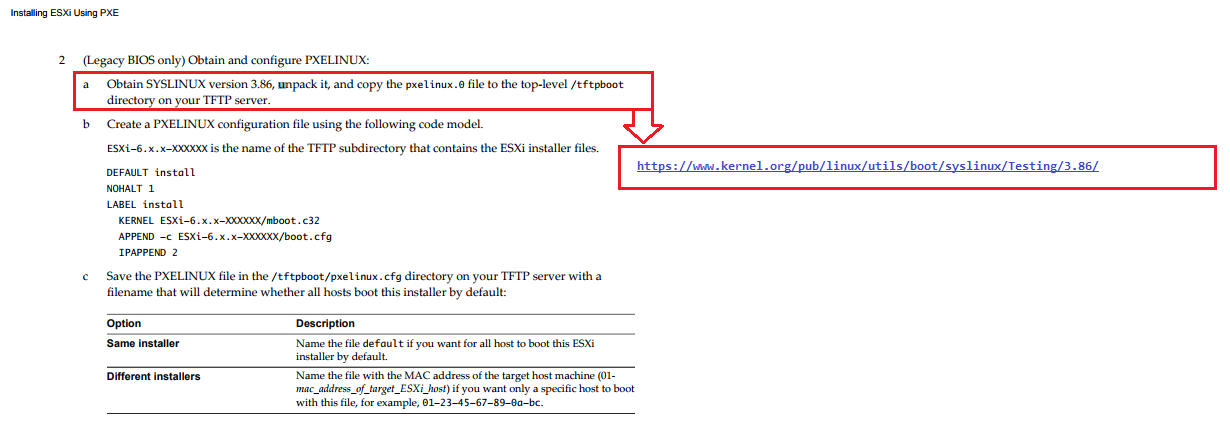
Get pxelinux.0 pxelinux file from here I have also read other peoples notes that say versions later than Syslinux 3.86 will be problematic. VMware’s docs (see 1 above) calls out Syslinux 3.86.
-
For NFS (my choice) to present the ks (kickstart file), I chose NFS because: a. Windows Server 2012 R2 has the NFS Server as a Native Service AND b. because I may need it for another ISO and kickstart later on !–BONUS–! Here is a pretty straightforward look at how to do setup NFS on Windows 2012 by Shane Rainville
-
VMware provides some nice ks (kickstart file) examples and groundwork here on KB-2004582.
!–BOUNS–! For more ks (kickstart file) look at this website by William Lam for examples -
Download HPE OEM ESXi from VMware (or chose some other reliable source)…translation: Vendor Download page?
Jumping into the mess at TFTP32 / TFTP64 utility
From this point, I am assuming you have built your Windows 2012 R2 VM, and you have downloaded all necessary docs and software.
For the TFTP64 Settings > Global tab:
- Enable TFTP Server
- Enable DHCP Server
- All other services are optional
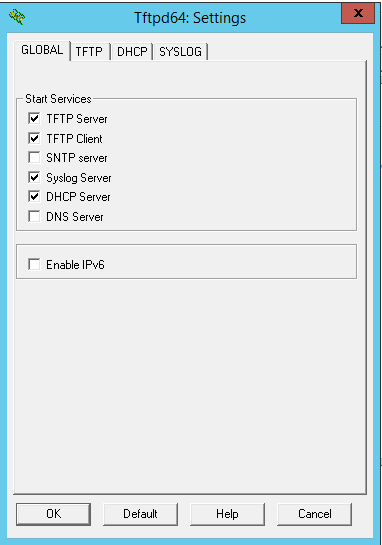
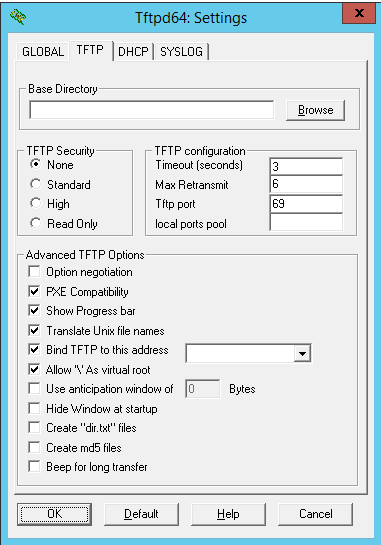
For the TFTP64 Settings > TFTP tab:
- Set your Base Directory
- TFTP Security - (your milage may vary) best rule of thumb - set to None and increase and test it as you increase it to make sure system is functioning properly.
- Advanced TFTP Options -> Uncheck option 1, check option 2 - 6. NOTE: I consider “PXE Compatibility” option 2. (see picture)
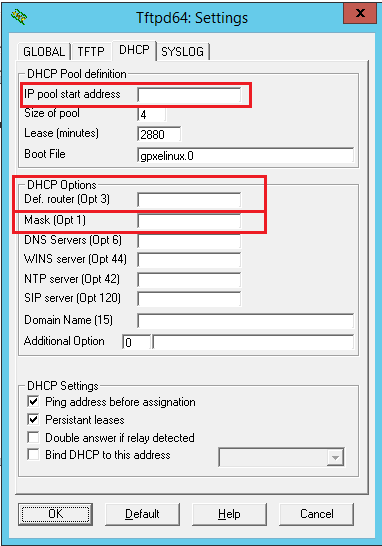
For the TFTP64 Settings > DHCP tab:
Unpacking gPXELinux.0 file
This is a direct picture from VMware’s docs that I called out earlier. I also added the pointer to the Syslinux location.
You definitely need to unzip which ever package you choose, and most importantly you need the gPXELinux.0 file.
NOTE: You may also end up needing other files if you do more customizations, so it’s a good package to have sitting around somewhere handy.
The screen shot from the VMware document (above) goes into some detail about where to place the gpxelinux.0 file. However, for a little more clarity on my system this is how it looks…
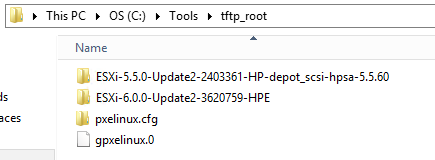
This directory contains 3 different types of items:
a. gpxelinux.0 file
b. pxelinux.cfg directory
c. ISO File directory
Configure NFS on Windows Server 2012
Setup NFS by Shane Rainville on Windows 2012
This is basically handled in two (or three) sections…depending on how you look at this.
a. Install Services for NFS
b. Configure the NFS Share (where clients will connect to)
I try not repeat word for word what other people have written and discussed. (However, in some cases that is unavoidable. And I try my best to provide credit when I do quote someone or some organization.) In this case, it is probably just easier if you go read what Shane Rainville wrote.
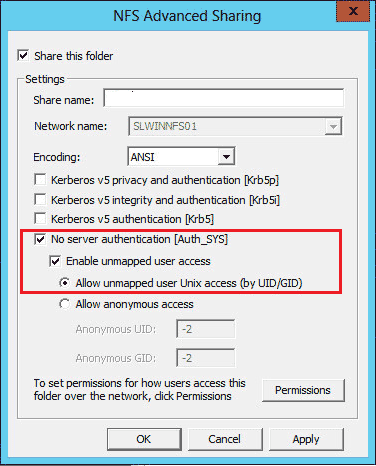
The biggest “stumbling block” for me when working with NFS, was getting the sharing to behave as I wanted. I found that using the settings:
a. No server authentication [Auth_SYS]
b. Enabled unmapped user access
c. Allow unmapped user Unix access (by UID/GID)
For this, I am not sure if these settings are the best. But I do know these settings work. I am not claiming to be an expert on what is right or wrong about this from a security standpoint. I recommend testing this in an environment (VLAN) not exposed to Internet Access.
The Kickstart File (KS for short)
My Kickstart file named ks.cfg.
You can do a whole lot more with these Kickstart files. However, I have intentionally made mine very generic to allow for further customization when using other Automation processes.
#
# Sample scripted installation file
#
# Accept the VMware End User License Agreement
vmaccepteula
# Set the root password for the DCUI and Tech Support Mode
rootpw S0m3p@$$w0rd
# Uses the first disc (SD Card or USB drive) as target for ESXi
install --firstdisk --overwritevmfs
# Set the network to DHCP on the first network adapater
network --bootproto=dhcp --device=vmnic0
reboot
# A sample post-install script
%post --interpreter=python --ignorefailure=true
import time
stampFile = open('/finished.stamp', mode='w')
stampFile.write( time.asctime() )
If you have not looked at William Lam’s website before, he is a great resource as VMware community member and usually has excellent content. Take a look at what this website by William Lam has for Kickstart examples.
The official VMware website KB-2004582 has some wonderful info as well. Specifically, they can tell you what are all the flags you can set.
Copy VMware ISO to correct folder
Once you get your preferred VMware ISO downloaded, place the ISO folder (with contents) in the TFTP_Root or somewhere else where it will be accessible during the PXE Boot process.
I listed my organization above, but the ISO can actually be in a few different places.
You will likely start off with a file named “default” like this in your “..\tftp_root\pxelinux.cfg” directory.
NOTE: the file “default” has no file extension.
default menu.c32
menu title ESX Boot Menu
timeout 400

##PXE boot the installer and perform a scripted installation with
##local or remote media (RPM files), as specified in the installation script

label scripted
menu label 1 - ESXi Scripted Installation for HPE G9s
KERNEL ESXi-6.0.0-Update2-3620759-HPE/mboot.c32
APPEND -c ESXi-6.0.0-Update2-3620759-HPE/boot.cfg

label hddboot
LOCALBOOT 0x80
MENU LABEL 0 - Boot from LOCAL DISK
The last file that you will want to update is “boot.cfg” located at “..\tftp_root\ESXi-Install-ISO” directory. The file will actually show something that looks a little different,
a. Each file listed will look like this "/tboot.b00" or "/b.b00"
b. kernelopt line will be default
So you have 2 things to do here:
- Remove the leading “/” character on each file name (easy with notepad.exe) with a quick search and replace.
- Set the kernelopt line to “kernelopt=ks=nfs://10.x.y.z/nfs_root/ks.cfg” or something similar
The last file that you will want to update is “boot.cfg” located at “..\tftp_root\ESXi-Install-ISO” directory. The file will actually show something that looks a little different,
a. Each file listed will look like this "/tboot.b00" or "/b.b00"
b. kernelopt line will be default
So you have 2 things to do here:
- Remove the leading “/” charecter on each file name (easy with notepad.exe) with a quick search and replace.
-
Set the kernelopt line to “kernelopt=ks=nfs://10.x.y.z/nfs_root/ks.cfg” or something similar
prefix=ESXi-6.0.0-Update2-3620759-HPE
 bootstate=0
 title=Loading ESXi installer
 timeout=5
 kernel=tboot.b00
 kernelopt=ks=nfs://10.x.y.189/nfs_root/ks.cfg
 modules=b.b00 --- jumpstrt.gz ...
An interesting side effect is we can use a very similar method to basically launch any Linux based ISO we want by using this same method.
Now we can try this out.
When booting a “potential ESXi host” you should see the following:
- Post
- PXE Boot from selected NIC
- Your PXE Boot Menu - where you select the boot option (or if your option is first on the list, just let the timeout expire)
- Verify host boots from the ESXi ISO files located in the directory you specified
- After the Install of ESXi (and host reboots) - Verify ESXi host gets the correct config based on of your Kickstart file
In the future, I plan on having a video here for a further demonstration. (No ETA)
Hopefully, this “how to guide” was easy enough to follow and makes Windows an option in the toolbox for ESXi Kickstart. Overall, as I said at the outset, Kickstart on Windows, may sound more complicated, but it actually works pretty well and is pretty easy to set up. I am optimistic that this article has actually made the ESXi kickstart process easier to understand if you are not a Linux user.
Please send me your feedback.